
6 Creating Assignments
Creating assignments is a key skill to have in your ICON toolbox! Here’s how to create and publish assignments.
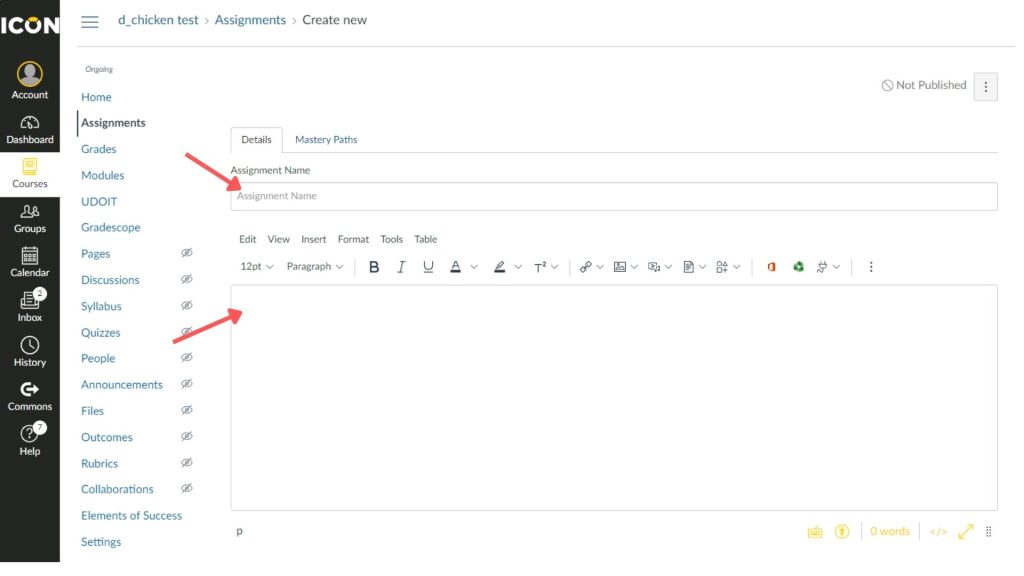
First, click the assignments tab on the left-hand navigation menu. Then, select the +Assignment button in the upper right-hand corner of the menu.

Once you create an assignment, you’ll see a series of text boxes. You’ll need to create an assignment name. Make sure this is clear and easy to understand– sequential or recurring assignments should have clear numbers, dates, or labels. Underneath the Assignment Name textbox is the assignment description. You can enter key details about the assignment here.
Scroll down on the page to make further selections for the assignment.
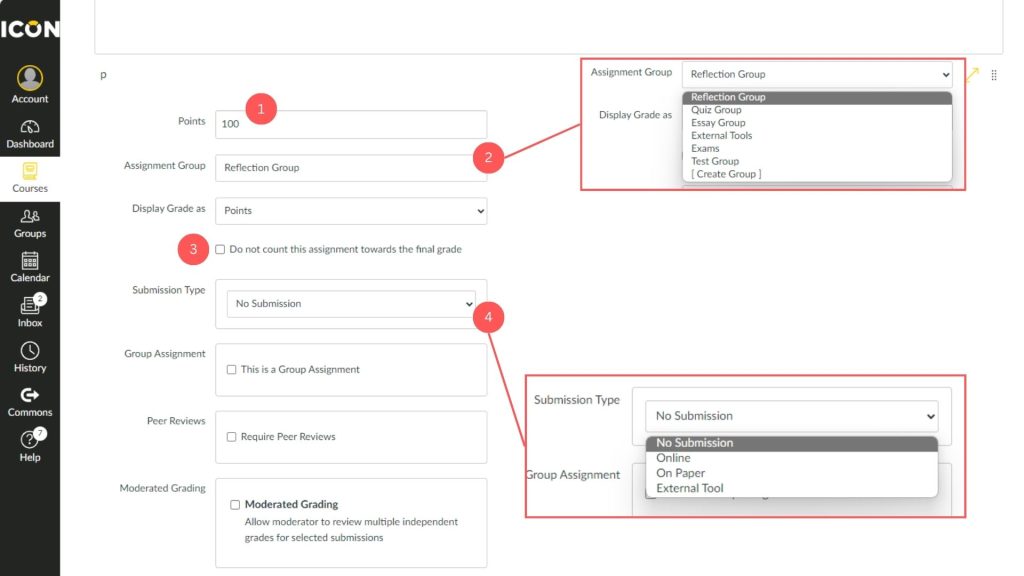
- This is the Points field. Here, you’ll specify how many points this assignment is worth. For more information on weighted assignments, visit Chapter 11: Grades.
- Here, you’ll decide how much each assignment is worth in reference to other assignments.
- This is the assignment group dropdown. Here, you can select an assignment group you’ve already made or make a new one. Think of assignment groups as folders that organize your assignments. When you click on an assignment group, your assignment will live there.
Tip: Assignment groups are important when you weight your grades, so make sure you organize them that way. For example, all assignments worth 20% cumulatively should fall in one group, all assignments worth 30% cumulatively should fall in another group, etc.
- If you’d like to keep this assignment from contributing to the final grade, you can check this checkbox. You can edit this both before and after an assignment is graded. (There are other options to automatically drop lowest grades. For more information on high/low drops, visit Chapter 11: Grades.)
- This identifies the submission type dropdown. The options are No Submission, Online, On Paper, and External Tool.
- If you select No Submission, students won’t be able to turn in an assignment through ICON. This is a good option for an assignment that was completed in person.
- If you want your students to hand in their assignments on paper, choose the On Paper option.
- The Online option allows you to accept text entries, file uploads, URLs, annotations, and other media like photos or videos. You can also upload a UICapture video here.
- External Tools is good for ICON integrations such as Gradescope, Peerceptiv, or Perusall. (For more information on ICON integrations, visit Chapter 15: ICON Direct.)
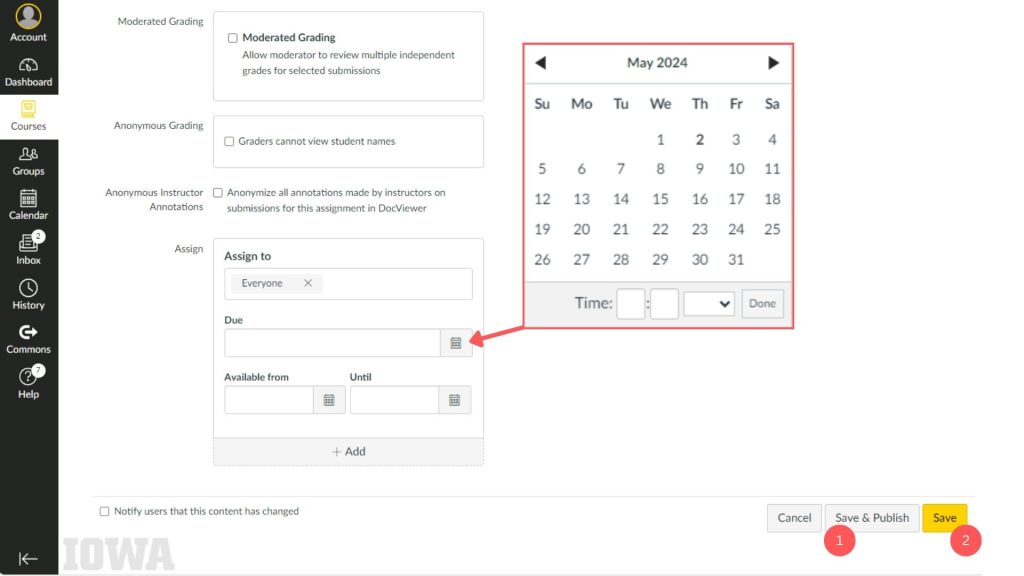
Now we’ll set the assignment due date. Click the calendar icon next to the text field. The Available from and Until fields will allow you to define how long students can access an assignment. This might be helpful if you won’t cover the material until Friday, for example, and want to restrict access until after class.
Then it’s time to save your assignment. In the bottom left corner, you can hit the gray Save & Publish. This button immediately posts the assignment when you click it. If you’re not ready to post your assignment, click the yellow Save button (dot 2).
Tip: Saving your assignment before posting means you can check that the assignment is in the right group and module before students get access.
If you want to publish your assignment later, no worries! Here’s what to do if you’ve saved your assignment and are ready to publish it.
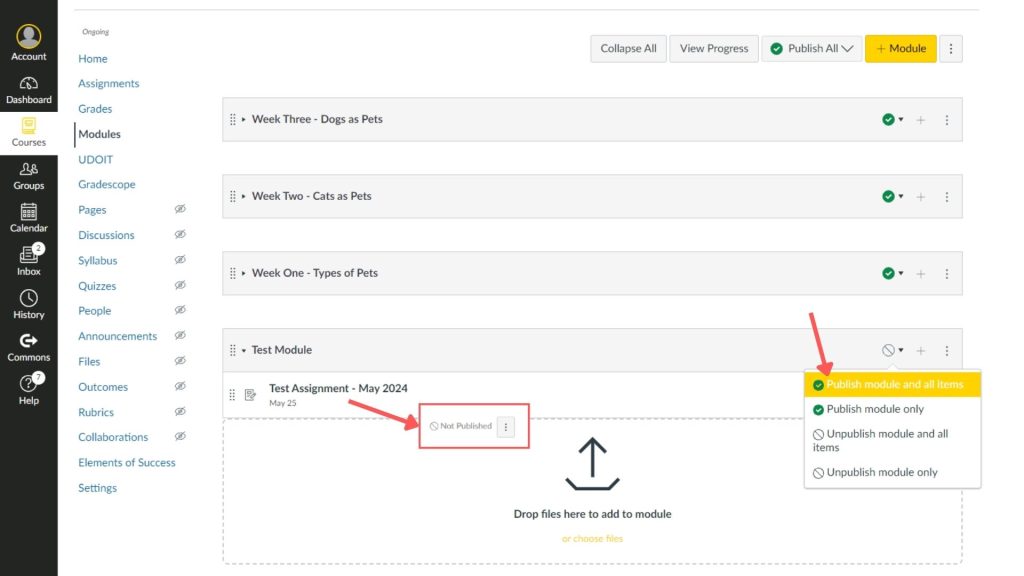
First, we’ll go to the Modules tab and make sure our assignment is in the right module. For more information on organizing modules, visit Chapter 8: Making and Organizing Modules. You can check to see if your assignment is unpublished by checking the symbol on the right. If your assignment is published, you’ll see a green check mark. If your assignment is unpublished, you’ll see a gray “no” symbol. If you want to publish just one assignment, you can click on the gray “no” symbol. Once it turns into a green checkmark, your assignment is published!
In the instance below, our module is also unpublished. We can click that gray “no” circle to open the dropdown menu to publish the module and all its assignments. If you want other publishing/unpublishing options, you’ll choose those from the dropdown menu here.
Tip: You can publish all the assignments for a course at the beginning of the semester and link them weekly in modules. This way, your students can see upcoming assignments on their dashboard and better plan for the semester.
If you need to edit your assignment throughout the semester, just click on the three dots on the far right side of your assignment.
Congratulations! You’re ready to assign coursework. Happy ICONing!
Helpful Resources
Still have questions? Book consultation with a SITA!
SITAs work one-on-one with instructors on projects that enhance instruction with technology. We’re with the Office of Teaching, Learning, and Technology, which provides expertise, tools, and services to optimize teaching and learning through learning sciences research, ICON, teaching and learning data, and advanced classroom and instructional technology.
You can schedule an appointment or email us at sita@uiowa.edu.