
8 Making and Organizing Modules
Now, we’ll learn how to make and organize modules. (Don’t forget to publish your module once it’s all set up!)
Tip: Don’t underestimate the power of a well-organized site! Taking some time to organize your modules week by week (Week 1, Week 2, etc.,) will lead your students to success. As SITAs and students, this is one of our number-one suggestions for first-time and experienced professors alike.
Creating Modules
First, navigate to the Modules tab on the left-hand sidebar. Then, click on the yellow +Module button in the top right corner.
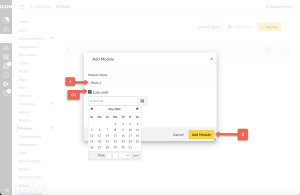
A pop-up will appear. This is where you’ll title your module. If you’d like, you can lock your module until you want students to see it. When you’re done, click the yellow Add Module button in the corner.
Tip #1: It’s helpful to go week by week, but you can also title your module by resource name, like “Readings for Essay 1,” etc. You can also add a “Supplementary resources” module for any helpful how-tos, study guides, and review materials.
Tip #2: As students and SITAs, we find it most helpful when professors don’t lock their modules. This helps students prepare for the readings and assignments ahead. Still, your course design is ultimately up to you.
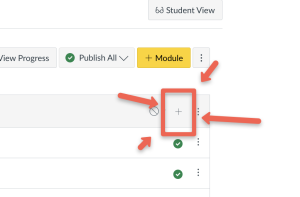
Now you’ll see your unpublished module.
To add files and media, drag and drop your files into the box below. You can add documents, PowerPoint presentations, images– whatever you’d like!

Next, we’ll add assignments and quizzes that we’ve already made. For more information on creating assignments, visit Chapter 6: Creating Assignments. For more information on creating quizzes, visit Chapter 7: Creating Quizzes.
Click on the + sign on the far right side of your module.
You’ll see this pop-up screen. In the topmost bar you can decide what you’d like to add (if you’d like to add a quiz, choose quiz from the dropdown bar). Then you’ll click on the specific assignment/quiz you want to add. Finally, click the Add Module button in the corner.
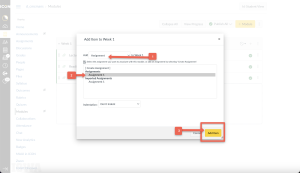
Hooray! Now you know how to add assignments and quizzes.
Publishing Modules
To publish your modules, hit the gray 🚫 button on the far right side of your module. You’ll receive a dropdown menu where you can publish (or unpublish!) your module.
You can also manage all your modules in the Publish All button next to the yellow +Modules button. You’ll see the same options, but you can publish/unpublish all your modules at once.

Editing Modules
You might want to make changes to your modules as the semester goes on. No worries! To start, click on the three dots on the far right side of your module. You’ll see this dropdown menu.
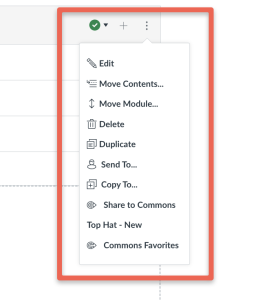
- To edit the title and “lock until” dates of your module, click edit. This is also where you can set requirements for the module if you want students to complete a particular quiz/assignment before they open the module.
- If you’d like to move the contents from this module into a different module, click Move Contents.
- If you’d like to change the order the files appear in, click Move module.
- This one is easy! If you want to delete the module, click Delete.
- If you want to duplicate this module, click Duplicate.
- If you want to share this module via email, click Send to.
- If you want to copy this module to another course, click Copy to.
- If you want to integrate Top Hat into your module, click Top Hat. For more information on Top Hat, visit Chapter 14: Options for Q&A Forums.
Note: the other two options are for Canvas Commons, where professors can share resources. If you want to check it out, go ahead, but that’s for sharing, not site-building!
Congratulations! Now you can make, publish, and organize modules.
Helpful Resources
From the Canvas help site:
Still have questions? Book consultation with a SITA!
SITAs work one-on-one with instructors on projects that enhance instruction with technology. We’re with the Office of Teaching, Learning, and Technology, which provides expertise, tools, and services to optimize teaching and learning through learning sciences research, ICON, teaching and learning data, and advanced classroom and instructional technology.
You can schedule an appointment or email us at sita@uiowa.edu.